Email Retention and eDiscovery
Posted by Nishi on 22 November 2022
Email retention
Email retention is the process of retaining emails in an organization for a specific period in an organized manner based on the policies of the organization. This is done for compliance or other such purposes, based on the organizational policies.
The main purpose of retention policy are the following:
-
Retention of email content for a specific period, so that it cannot be permanently deleted before the retention period.
-
Deleting the email content permanently after the defined retention period.
Email retention policy helps in compliance for legal purposes:
-
Compliance of industry regulations and internal policies to retain content for a minimum period of time.
-
Reduce the risk, in case of any event of security breach or litigation caused due to deletion of content by employees.
Does your organization require an email retention
Yes, if your company falls under Sarbanes-Oxley, SEC 17a-3/4, NASD 3010, HIPAA or other such regulations, then you will need to have an email retention policy. Moreover, email is the standard, universal and reliable communication mode for businesses - crucial and sometimes confidential too. They are often needed as substantial evidence. So a copy of the communication must be retained to ensure that the organization follows the compliance standards and can respond to any legal issues that arise related to such communications. This ensures that there is no data loss due to the deletion of data by the employees.
Enabling eDiscovery
eDiscovery (electronic discovery) refers to a legal process of “discovering” electronic data by identifying, processing, reviewing and producing retained emails which is potentially relevant to litigation. The advanced eDiscovery portal in Zoho Mail provides a complete solution to retain, review, export the emails related to your organization's internal, external or legal investigations. It empowers the legal teams to manage the holds and investigations.
Overall, it assures that the legal team can gather and access the required information in a simple interface, without technical dependency or complexity.
Steps to enable eDiscovery
-
Log in to your Admin account at https://ediscovery.zoho.com
-
The eDiscovery portal welcomes you with a small intro to email retention and eDiscovery.
-
Click the Enable eDiscovery button to enable eDiscovery for your organization.

Defining retention period
Almost every governmental regulations require "records" to be captured, managed, retained for specific periods of time, and made available to the governmental agency when asked. These records can include hard copy content, email, voicemail, instant messages, and social media.
The considerations for establishing and maintaining your organization’s email retention policy remain the same; they are: business needs, legal requirements, organizational culture, approaches to retention policies, litigation holds, automation, and implementation.
Steps to define a default retention policy
-
Once you enable eDiscovery, the next step to choose the Default retention period. The default retention policy determines the period for which the emails of all users in the organization would be retained.
-
By default, the retention period is 365 days. You can either define a specific number of days as the retention period or choose Retain forever, based on your requirements.

Note:
Default Retention Period can be overwritten by Custom Retention Policies which allow for certain mails of specific users or a certain type of email to be retained for a different retention period for a specific need. Refer Customizing retention policy for more details.
Defining retention rule
The retention rule acts as an ingestion filter for emails to be allowed into the eDiscovery service for archival. It provides you the option to choose the types of emails that you want to retain in the eDiscovery portal such as sent emails or received emails or retain only specific sub-set of sent/ received emails and so on.
Define appropriate Retention Rule to ensure you retain the required emails while not filling up your user's storage with unnecessary emails.
Steps to define a default retention rule:
-
Once you define the retention period, you can go ahead and define the Default retention rule.
-
Choose from the granular options available and set the ingestion rule for the eDiscovery portal.

-
Retain all emails
-
Retain based on the conditions such as:
-
Retain all sent emails Retain all sent emails - outside the organization
-
Retain emails sent - only within the organization
-
Alternatively, you can specify selected domains and choose to retain the emails that are sent only to those domains.
-
Retain all received emails
-
Retain all received emails - from external organization accounts
-
Retain emails received - only within the organization
-
Alternatively, you can specify selected domains and choose to retain the emails that are received from those domains.
-
Retain all deleted and/or spam emails.
Note:
The allocated user storage is used by the User's mailbox + eDiscovery + Backup. Therefore it is recommended to refine what you retain and for how long depending on your organization's needs.
Selecting user accounts
Once you define the retention period and retention rule, you will now select the users for whom the Retention should begin.
Steps to enable user accounts for eDiscovery:

-
Use the search option to search for specific users to enable retention for specific accounts
-
Click on the checkbox on the header and click on Select all users to enable retention for all the user accounts.
-
Click Enable Retention to start the retention process for the selected set of users.
-
Once you enable the retention, the emails that get delivered to these user accounts will be retained in the eDiscovery portal, based on the retention rules. The retention period will be based on the default retention rule applied to the accounts. The sync to the eDiscovery portal may take a while, after which you will be able to search/ view/ export the retained emails from the portal.
Using eDiscovery portal
Once you are done on-boarding the eDiscovery portal, you will be able to access all the features that the portal provides to manage your organization's data. Additionally, you can now also customize the portal settings apart from enabling/disabling users and creating new retention policies.
Create Investigation
An Investigation or a case is a legal probe against certain email communications or documents. When there is a legal case or a probe or an investigation pertaining to email communication, the organization needs to retain all the related emails until that investigation is completed/ closed.

The eDiscovery administrator creates a new Investigation to manage the entire investigation cycle. Sometimes the Investigation can be required for the purpose of internal investigation also.
Steps to create an Investigation in Zoho Mail:
-
In the eDiscovery portal, go to Investigations tab to view or create Investigations.
-
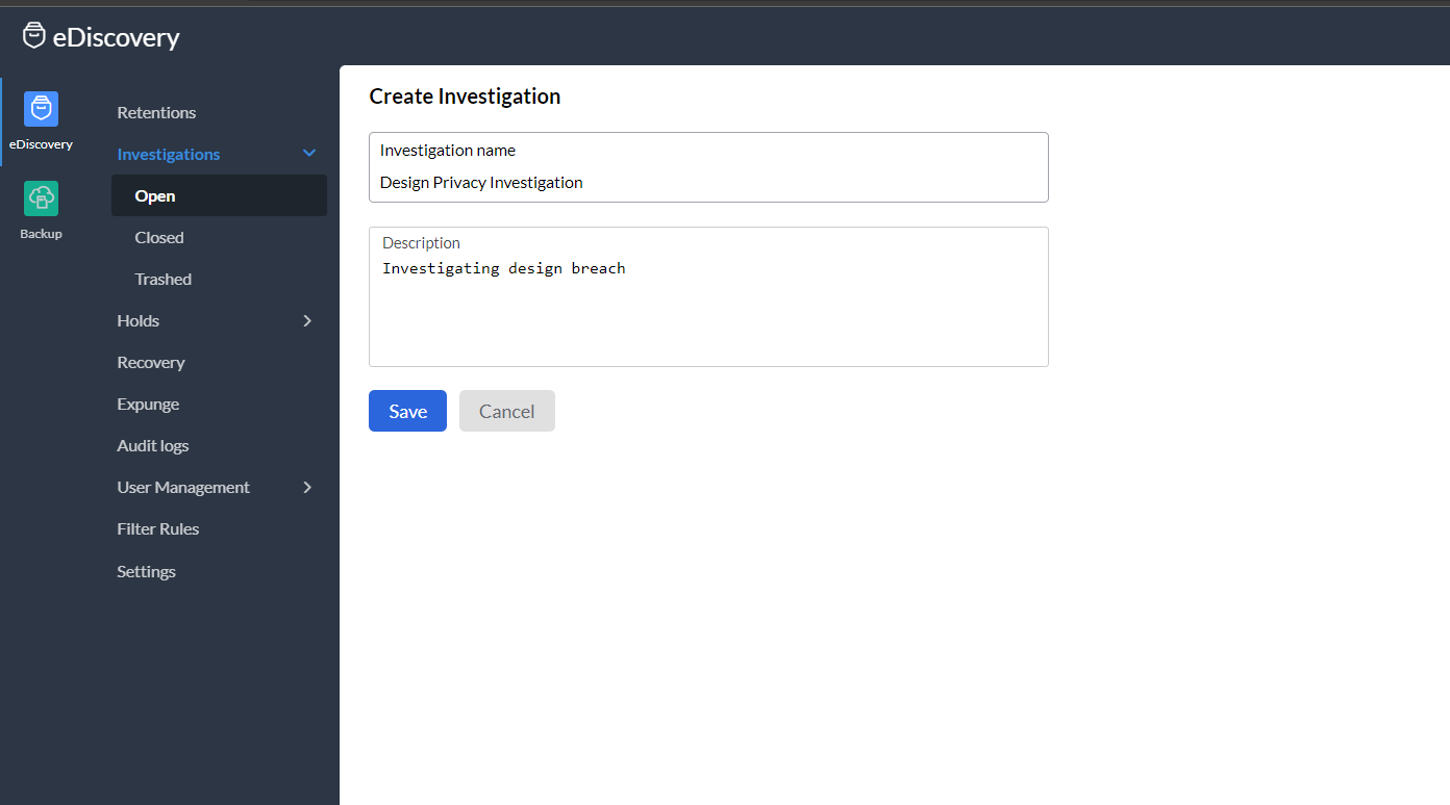
Click the + symbol to create a new Investigation.
-
Provide the Investigation name and a detailed description, for the particular investigation.
You can create single or multiple holds based on different conditions, as required for the investigation. The emails that are placed on a hold via investigations will not be deleted even after the expiry of the retention period defined by default or custom retention policy.
Searches
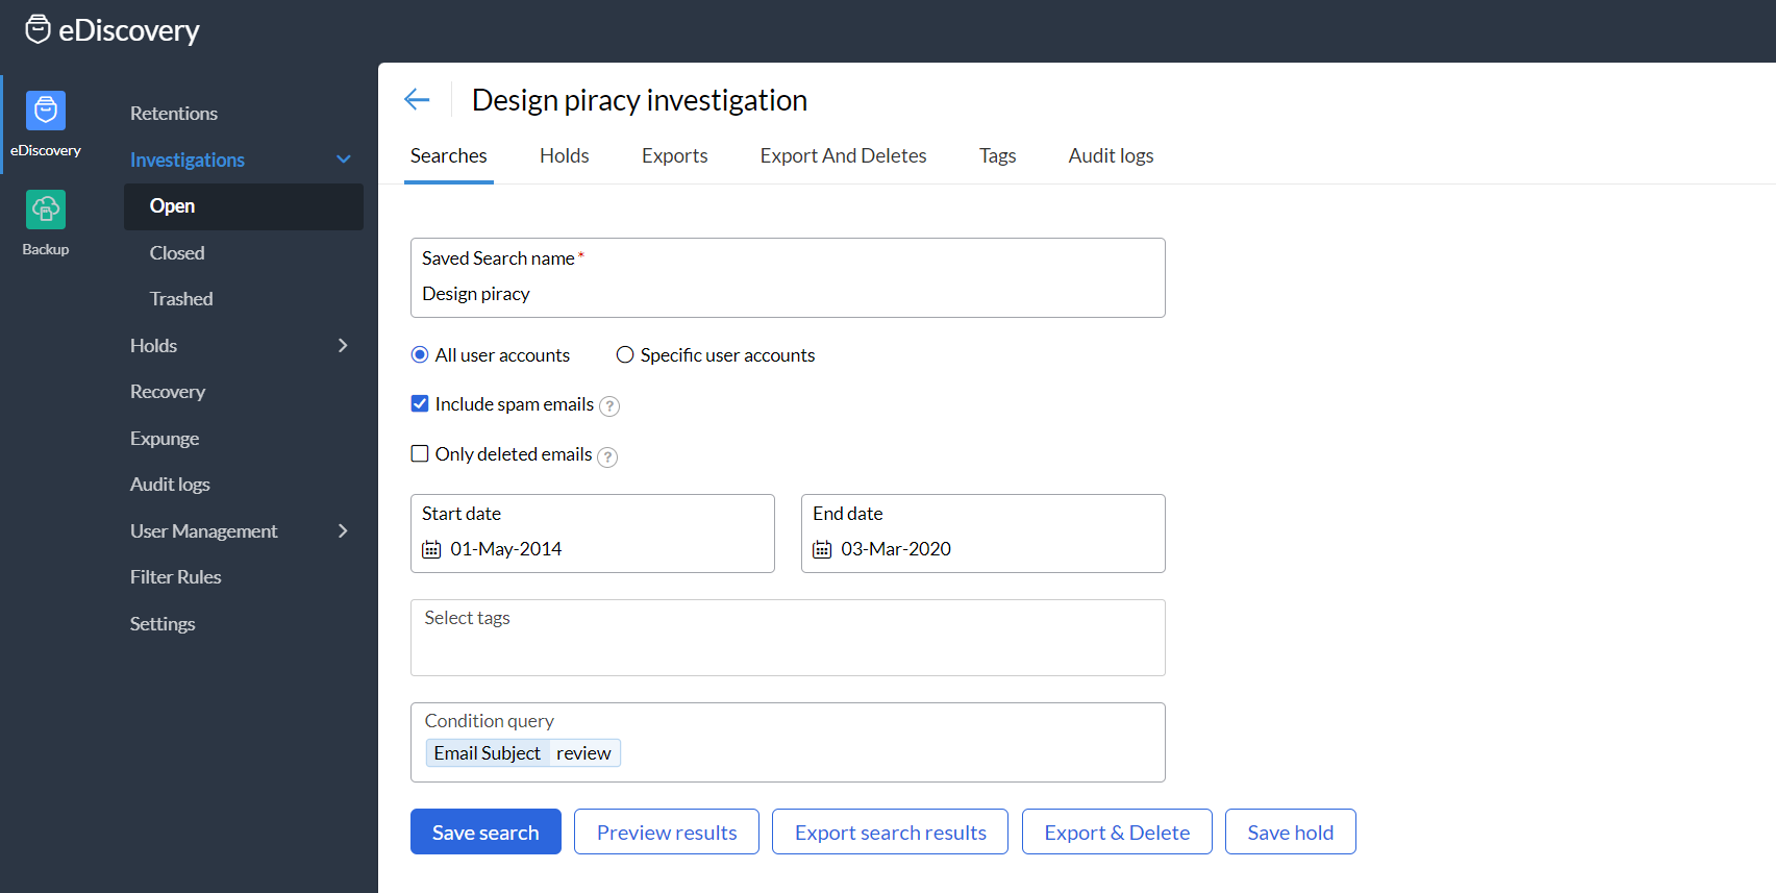
Before you create a Hold, list down the criteria required for the particular investigation. Based on the various criteria, create different search conditions. You can save each of these search conditions by clicking on Save search button. In case you need to get this reviewed by legal or compliance or admin teams, you can get it reviewed before you create a Hold. Search helps you try various saved search conditions on the data, preview results and validate these searches before creating the Holds.
To create a search, select the condition with which you'd like to perform the search and enter the search key respective to the condition. You can perform a search with multiple conditions, in which case the results returned will match all of the conditions that you have set for the search. In other words, an AND search will be performed.

For example, if you choose the To condition and enter the search key times.com, then choose the Cc condition and enter the search key technews.com, and finally pick the Has attachment condition, the results returned will be emails that have attachments and have been sent to times.com, Cc'd to technews.com. The emails that match all three of the entered conditions will be returned as results for this search.
Note:
• To search for an exact phrase, enter the search key in double-quotes. For example, if you choose the condition Contains and enter the search key as "media information", only the emails that contain the exact words 'media information', in that exact sequence will be returned as results. In case there are emails with the words 'information media', those will not be returned as results.
• If you want to search for emails that have words beginning with specific terms, add an * (asterisk) to the end of those terms. For example, if you want to search for emails that contain words beginning with the term gat, choose the parameter and enter the search key as gat*.
Administrators can Export or Export & Delete the data matching the search criteria by clicking on Export search results or Export & Delete button, respectively. On clicking the button, the action will be triggered and gets listed under the respective tabs along with its current status. Once the status shows completed, you can download the file in ZIP or PST format. To know more on the actions, refer Exports orExport and Deletes.
Note:
Export & Delete action will permanently and irrevocably remove the data from eDiscovery portal. Please note that since this action will leave no copies behind, it is recommended to download the file within 90days. It will also delete mails which are on hold or whose retention period is not yet expired, hence this option needs to be used with caution.
View / Download an email (EML format)
Now, in order to view or download the content of the emails listed in the Search result, follow the steps given below:
-
Under the Searches tab, provide the Conditional query to filter the emails and click on Preview results to view all the emails that matches the query.
-
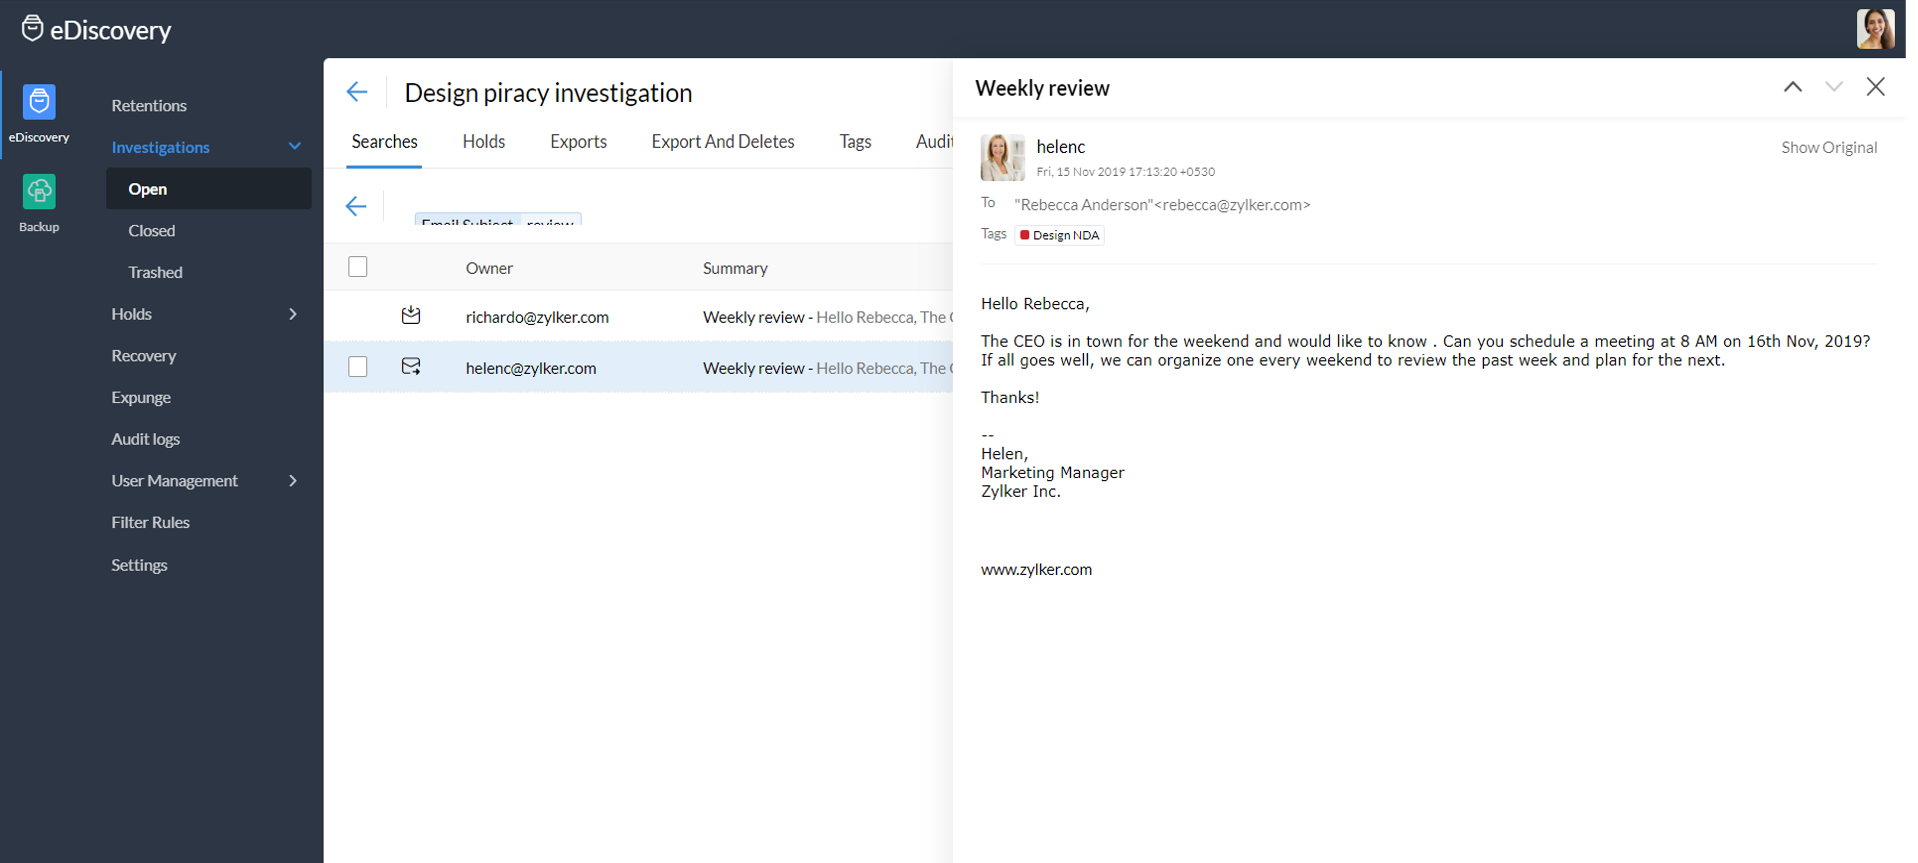
Click on the email you want to view from the list.
To Download an email in EML format:
-
Click on Show Original on the right top corner to view the original message.
-
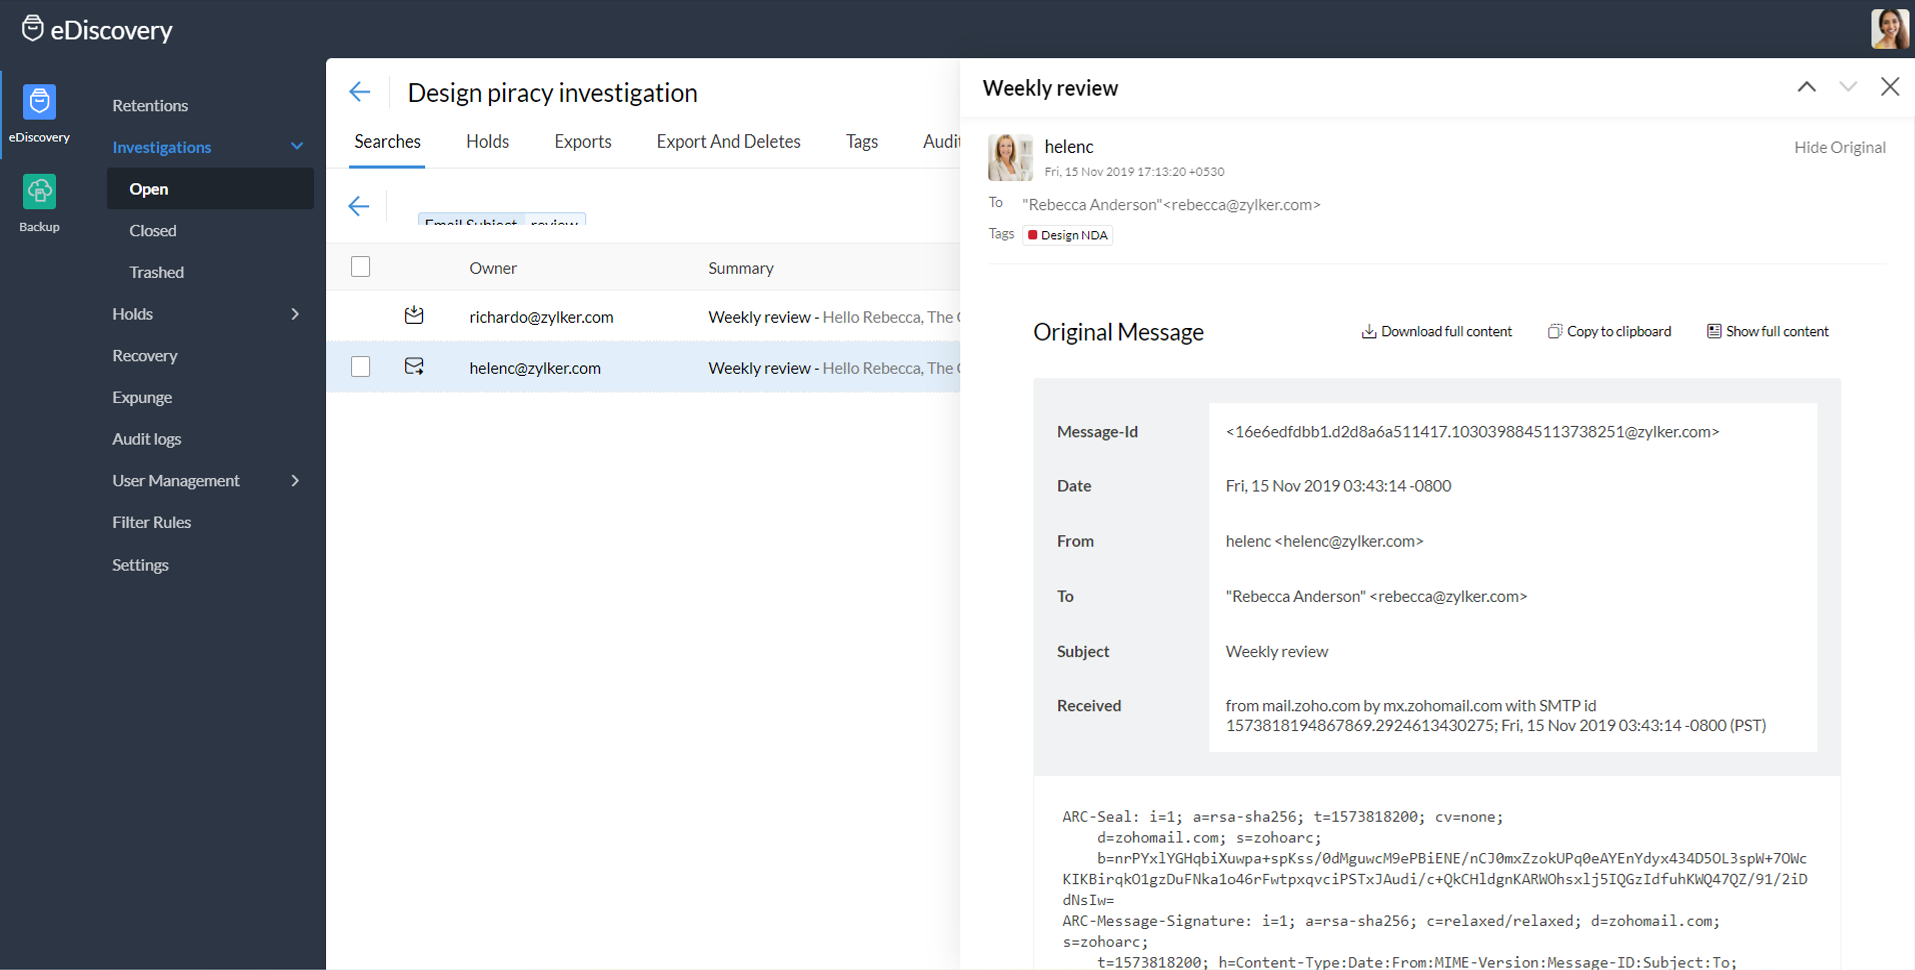
Options to Download Content or Copy to clipboard / Show full content are available on top of the message.
-
Click on Download Content to export an email in .eml format.
Holds
Each Investigation will retain emails based on one or more holds as needed for the Investigation. A Hold retains the email that is required for the investigation, based on a specific set of conditions. Since a single investigation or case may require to retain different sets of emails based on various conditions like the subject, received time, sender, attachments, custodians and so on, there may be multiple Holds created for each Investigation.

Once a Hold is created, the emails retained by the 'Hold' will be retained until the Hold exists.
Administrators can Export or Export and Delete the data matching the hold criteria by clicking on Export search results or Export & Delete button, respectively. On clicking the button, the action will be triggered and gets listed under the respective tabs along with its current status. Once the status shows completed, you can download the file in ZIP or PST format. To know more on the actions, refer Exports or Export and Deletes.
Note:
Export & Delete action will permanently and irrevocably remove the data from eDiscovery portal. Please note that since this action will leave no copies behind, it is recommended to download the file within 90days. It will also delete mails which are on hold or whose retention period is not yet expired, hence this option needs to be used with caution.
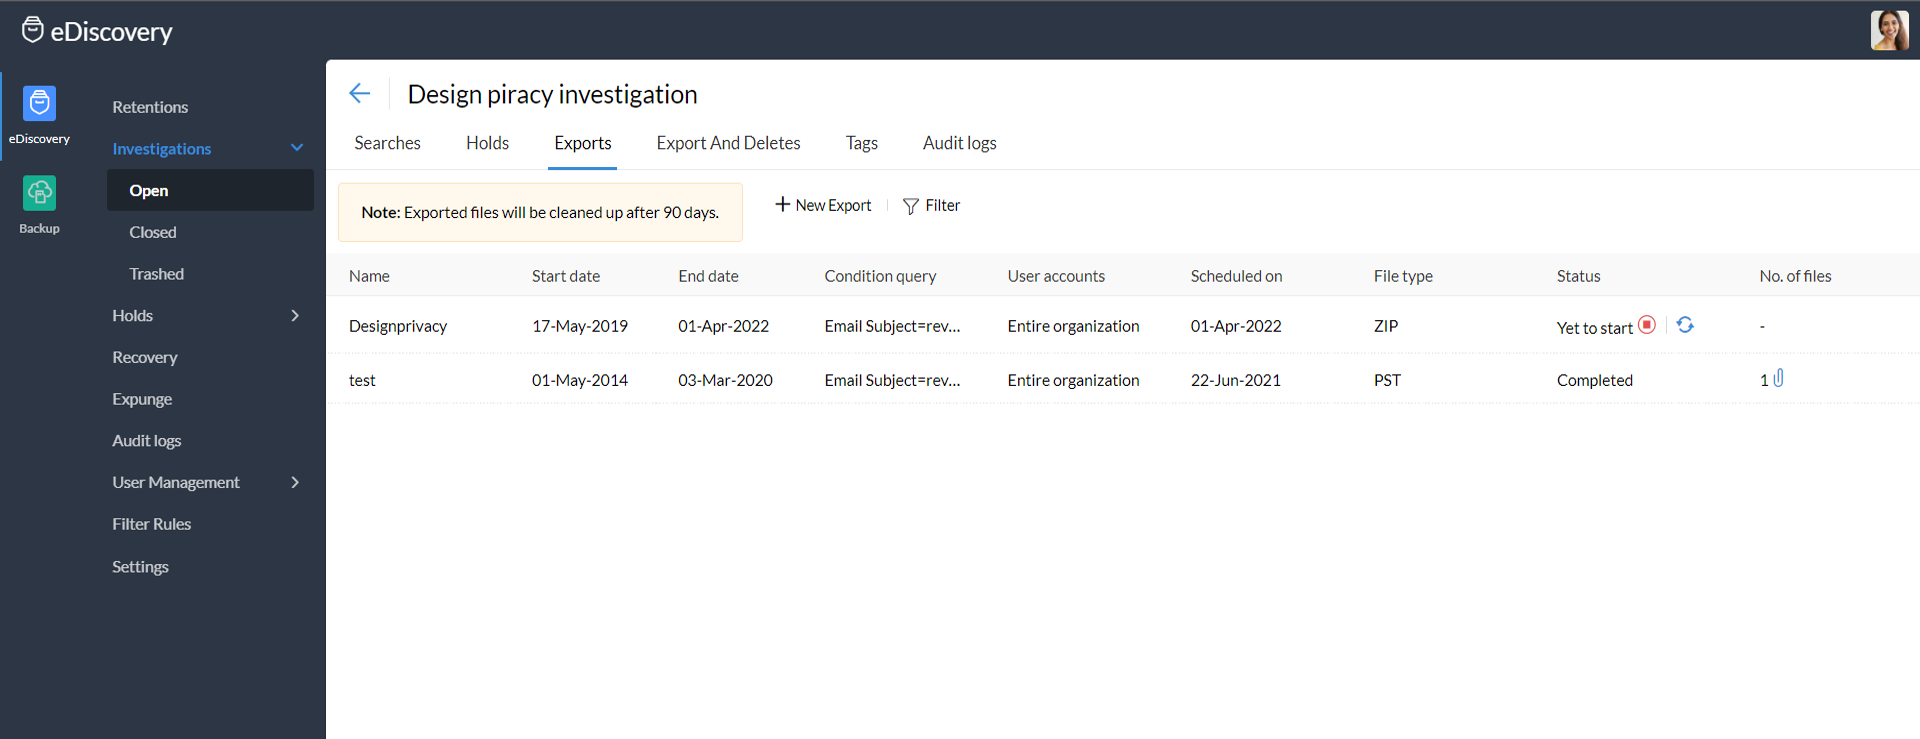
Exports
The results of a Hold or a Save Search can be exported by the administrator, whenever required. These exports will be listed under the Exports tab with its current status. Please note, it may take some time depending on the file size. Once the status shows completed, you can download the exported file by clicking on the link given.
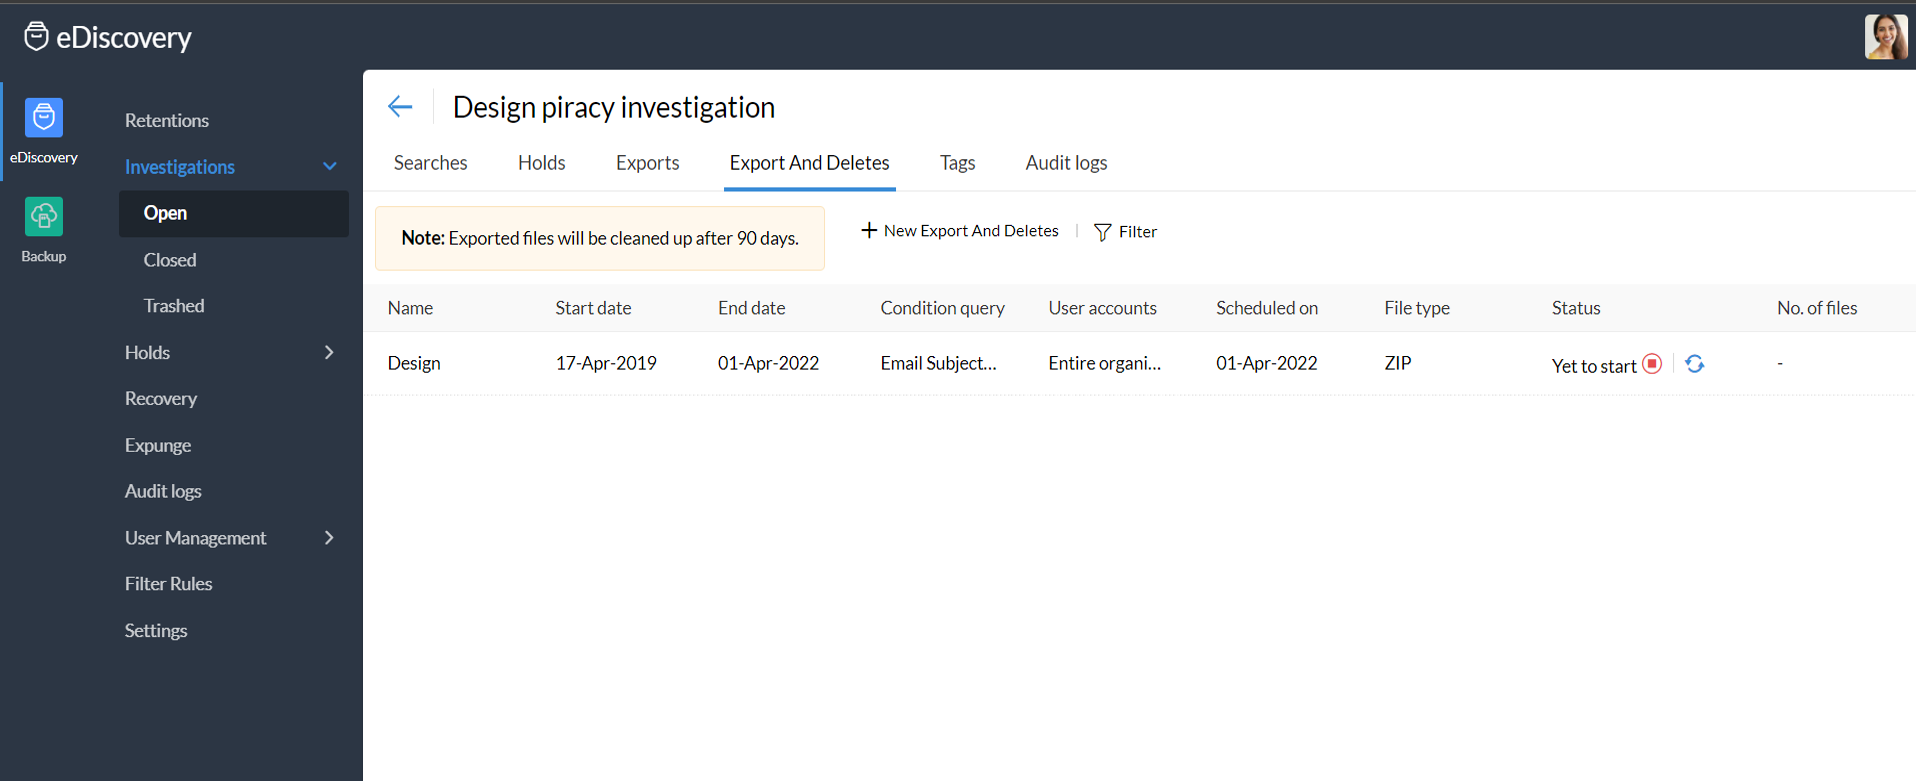
Export And Deletes
This tab lists the Export & Delete operations performed by the administrator along with the current status of the action. It may take some time to complete this action depending on the file size. Once the exported file is ready for downloading, the status will be shown as completed. Click on the file to view the details and the download link. The exported file will be cleaned up after 90 days and so, it is recommended to download the file within the said period.
As Export & Delete action will permanently and irrevocably remove the data from eDiscovery portal and leaves no copy behind, it is highly recommended to promptly download the file on time. It will also delete mails which are on hold or whose retention period is not yet expired, hence this option needs to be used with caution.
Tags
In a specific investigation, you can choose to tag emails from the search preview or the hold preview.
To create a tag and apply it to an email, follow the instructions below:

-
Go to the Investigations section, and select the relevant investigation.
-
Navigate to the Tags tab.
-
Select the Create Tag option, enter a tag name, pick a color, and click Save.
-
Now, select a saved search or a hold from the Searches or Holds tab.
-
Click the Preview Results option.
-
Select the checkboxes across the emails that you want to tag.
-
Select the Tag as option and choose the relevant tag.
-
These tagged emails can also be viewed from the Tags section. Click on a particular tag and all the emails associated with that tag will be listed.
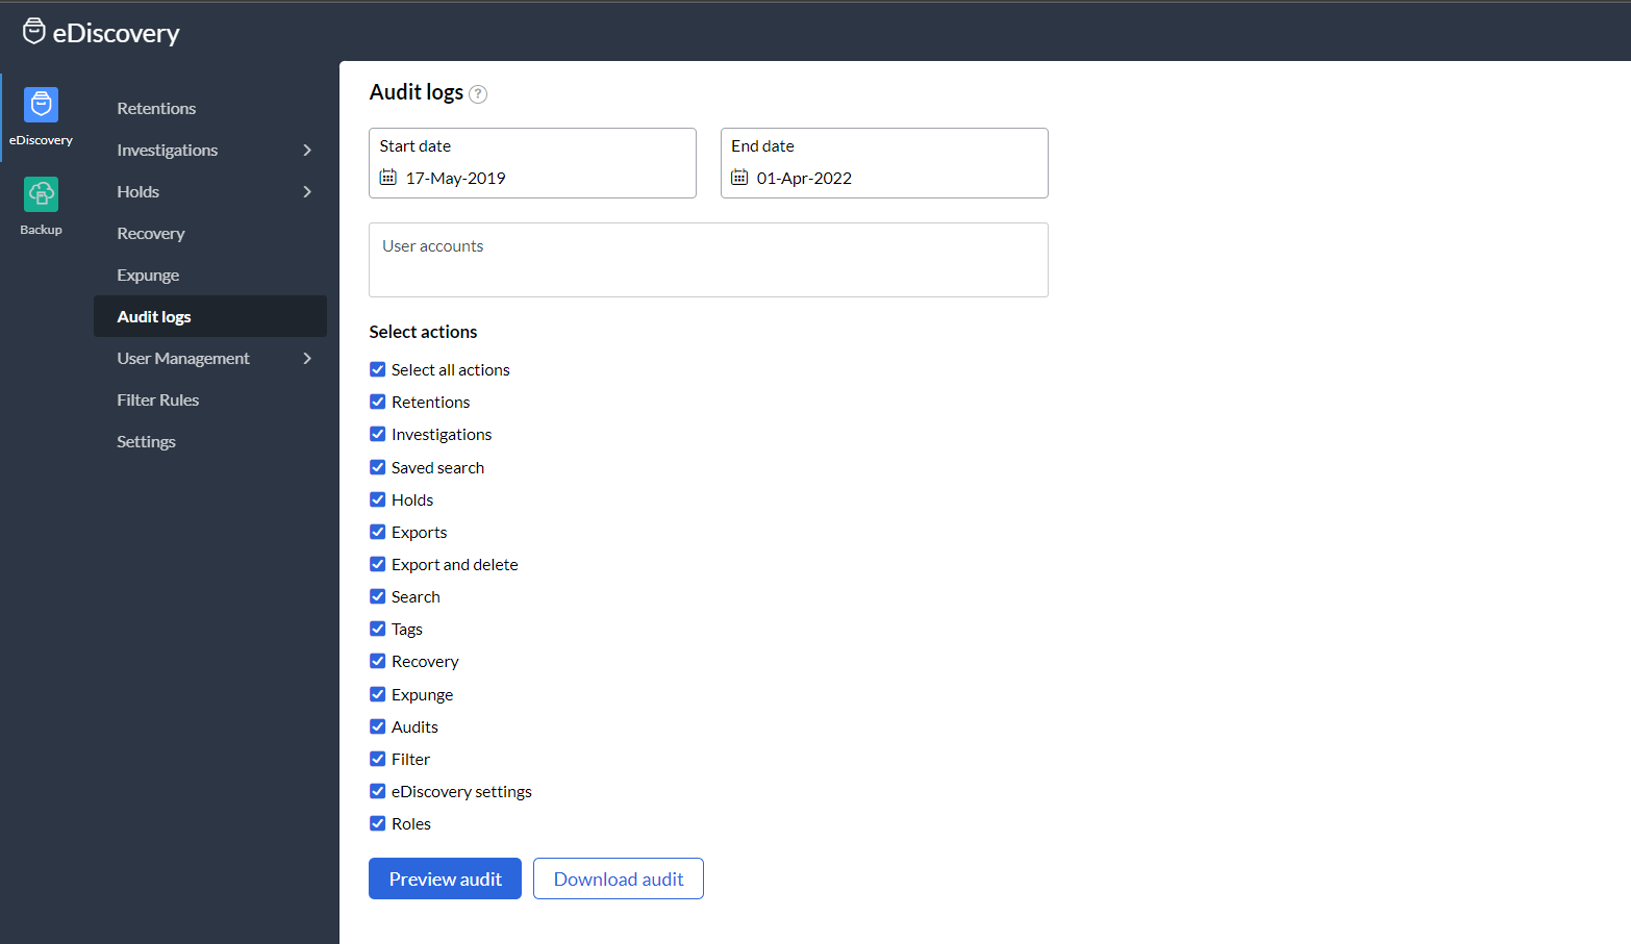
Audit logs for an investigation
Once you have created an investigation, you can also view all the related activity in the Audit Logs section, inside that particular investigation.
Steps to view the audit logs related to a particular investigation:

-
Go to the Investigations section, and select the relevant investigation.
-
Navigate to the Audit Logs tab.
-
Enter the dates within which you would like to view the activity.
-
Select the checkboxes across the actions that you would like to retain. You can choose to narrow down your search by unchecking the irrelevant checkboxes.
-
Select the Preview Audit option to view the activity or click the Download Audit option to download the activity onto your machine.
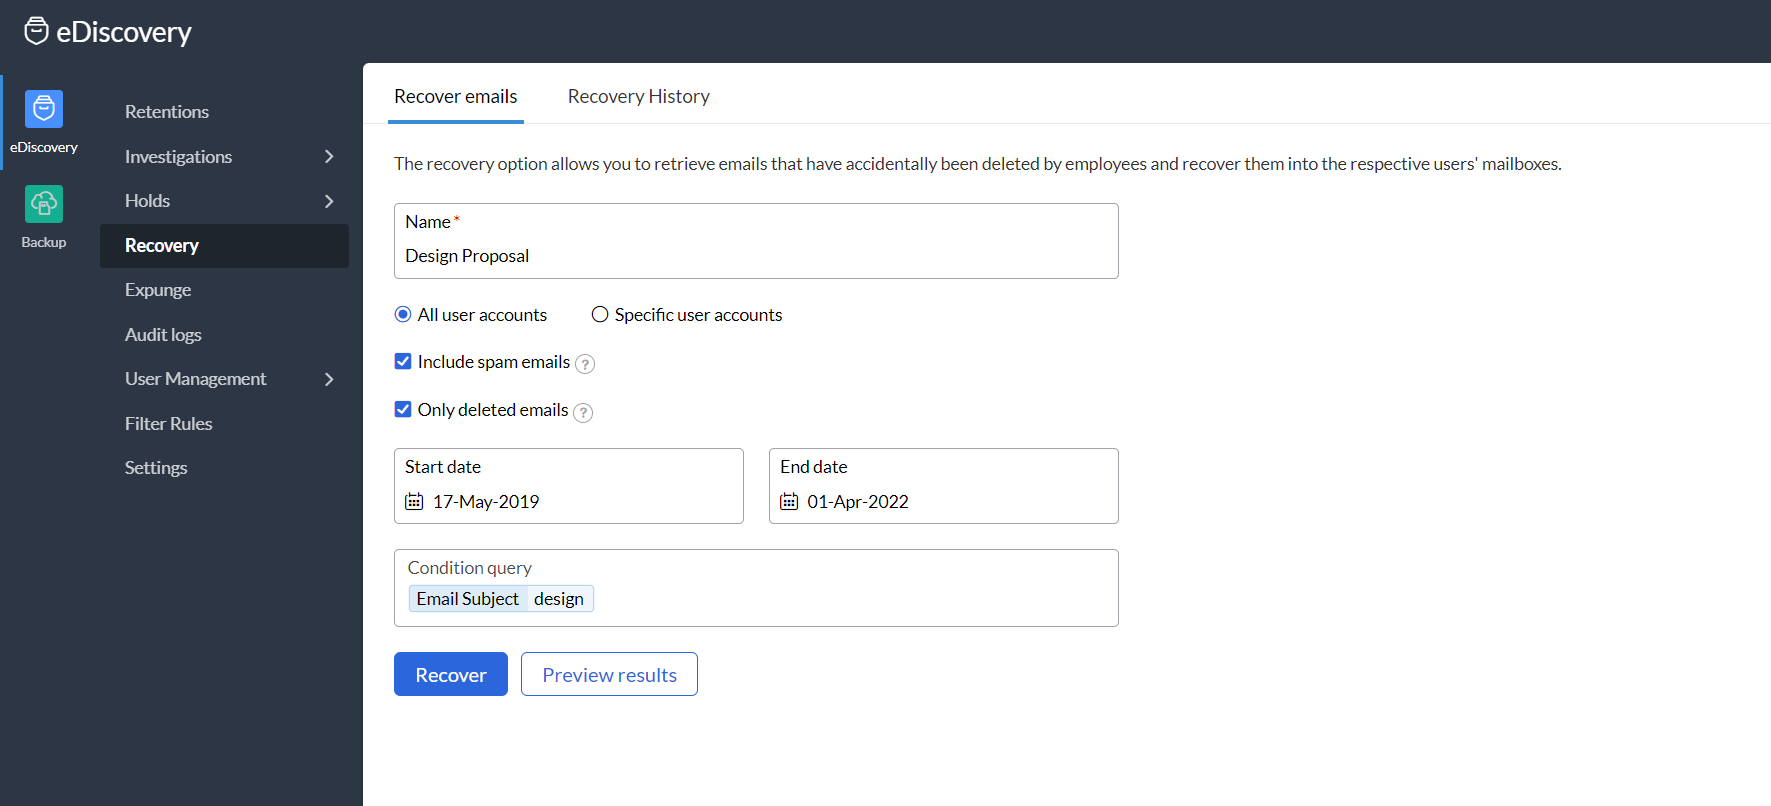
Recovery Emails
Email Recovery is a feature by which an administrator can restore a lost or accidently deleted emails back to the user's mailbox from the archival. As an administrator, you can choose either 'all user accounts' or 'specific user accounts' to recover and restore the archived emails back to the mailbox, when required.
Steps to recover an email from eDiscovery:
-
Insert a name relevant to the case under the Recovery emails tab.
-
Select either all user accounts or specific user accounts. In case you choose specific user account, then specify the user accounts under user mail boxes.
-
Select the checkboxes i.e. include spam emails and only deleted email, whichever required.
-
Enter the start and end dates and insert relevant search criteria under condition query.
-
Choose Preview Results, if you wish to ensure the search conditions are matched.
-
Click Recover to restore the emails back to the user mailbox.
Note:
On recovering a mail from eDiscovery, the mail will be restored back to the user mailbox while retaining a copy of the same in the archives. However, the copy of the mail will be deleted from backup.
Recovery History
All the recovery actions performed along with the details are logged chronologically under the Recovery History tab. By default, the Retention history will be cleaned post 90 days. However, the cleanup duration can be set by the admin under Settings tab.
Expunge Emails
Expunge is a feature which allows an administrator to delete a particular email from the user's mailbox. As an administrator, you can either delete a mail with or without any user request (in case of any virus or phishing emails).
Steps to expunge an email from eDiscovery:

-
Provide a name relevant to the expunge case under the Expunge emails tab.
-
Select either all user accounts or specific user accounts. Mention the user accounts, in case you choose specific user accounts.
-
Include spam emails, if applicable. This will include spam emails as well in the search.
-
Specify the start and the end dates for the search and mention the search criteria.
-
Perform conditional search to filter out an email from the user’s archive.
-
Click on the Preview Results to view the filtered emails.
-
If the results match, click on Expunge to delete the mail from the user's mailbox.
Note:
On Expunge, the mail will be deleted from the user's mailbox. However, a copy of the mail will be retained in the Archive.
Expunge History
All the expunge actions performed along with the details, are logged chronologically under Expunge History tab.
Audit logs
All the actions of the administrators in this portal will be recorded in the Audit logs section. Instead of viewing the activity specific to an investigation, you can view all the activity in the eDiscovery portal here.
Customizing eDiscovery settings
Enable / Disable eDiscovery
As an administrator, you can customize your eDiscovery portal by clicking on the Settings tab. This section allows you to enable or disable eDiscovery for your organization. In case, you have already enabled eDiscovery and later, due to some unforeseen reason, wishes to disable the service, then the emails that gets delivered to your organization's user account will no longer be archived, while the older emails will be retained as per the existing retention policy.
Auto-enable for new users
Here, you also have the option to enable Auto-enable for new users. When Auto-enable for new users is checked, emails will be archived as per the default retention policy for every new user joining the organization. In case, auto enable for new user is disabled, administrator will still have an option to enable eDiscovery for the new user under the Users tab, whenever required, but manually.
Enable eDiscovery access for users
Administrators can decide if users can access their permanently deleted emails and recover them directly from their mailbox. To allow users to access or recover emails from their mailbox, follow these steps:
-
Log in to Zoho Mail Admin Console and select eDiscovery from the left pane.
-
Navigate to Settings under eDiscovery and select the Allow Users to access their retained emails option.
-
Click the User Management link on the Settings page or manually navigate to the Users page.
-
Log in to Zoho Mail Admin Console and select eDiscovery from the left pane.
-
Navigate to Settings under eDiscovery and select the Allow Users to access their retained emails option.
-
Click the User Management link on the Settings page or manually navigate to the Users page.
-
Hover over the desired user and click the admin icon under Permissions.
-
Select the desired Permissions from the available options:Allow user to access their retained emails - This option enables eDiscovery access in the user's mailbox. With this permission, users can view deleted emails but cannot recover them. For more details refer to Access to retained emails.Allow user to recover their retained emails - Allows the users to search the deleted emails and recover them back to their Inbox. For more details refer to the Steps to recover emails. You can enable this permission only if the Allow user to access their retained emails option is enabled.
-
Click Save.
-
Alternatively, you can select multiple users, click Permissions from the top menu and enable the desired permissions. Once done, click the Save button.


Recovery Cleanup
Administrators can set up a duration in order to clear the recovery stats in the eDiscovery.

eDiscovery ingestion Filter
Every organization's need for data retention varies according to the industry and their business needs. Some may require storing all emails of the entire organization for compliance purposes, while others may choose to store certain VIP mailboxes or certain client communication emails which were sent to or received from outside the organization.
As an administrator, you will know your organization's goals for retention and can determine what needs to be retained in eDiscovery.
In order to control what gets stored / retained you can create an eDiscovery Ingestion Filter. You can do this in the following ways:
-
While on-boarding you can select the filter criteria by which only a subset of emails get retained, this filter (EDISCOVERY_FILTER) is a default ingestion filter and it is applied on all user mailboxes.
-
To have a more fine-grained or granular control on specific filters on certain mailboxes, say group mailboxes or emails from a certain department, etc. you can create custom Ingestion Filters.
Steps to add eDiscovery Ingestion Filter (Custom Ingestion Filter):

-
Go to Filter Rules and Click on Add Filters.
-
Provide a Filter Name.
-
Select either All emails or Emails based on conditions below.
-
If you select All emails, mention the users and click Save.
-
In case you select Emails based on conditions below, specify all the conditions (all received emails/received from within the organization/received from outside the organization, all sent emails/sent within the organization/sent outside the organization, deleted emails and exclude spam emails). You can also mention specific domain(s) under the All sent emails and All received emails category.
-
Mention the Associated users it applies to and click Save.
Once the filter is saved, the new custom filter will appear under list view. Click on the Filter name to view its details or edit permissions, if required. Click on the Associated users tab to view the list of users associated to this filter.
Manage eDiscovery Storage
The user's mailbox, eDiscovery and Backup share the storage allocated to a user. If you no longer require certain emails in Retention, you can remove those in order to free-up the user's storage. Follow these steps to remove emails from retention:
-
Login to Zoho Mail Admin Console and select eDiscovery from the left pane.
-
Select Investigations and click Create Investigation.
-
Enter an Investigation name and an optional description.
-
Select the investigation name and click New Search.
-
Enter the values in the below fields in order to free up the storage space:Name for the searchSelect either All user accounts or Specific user accountEnter the User mailboxes if you chose Specific user accountIf required, select Include spam emails and Only deleted emailsSelect the date range for which the emails are to be deleted from retentionSelect a condition for the query and specify the search criteria.
-
Click Export & Delete.
-
Enter the Export name and the encryption password.
-
Select ZIP or PST under the export file type and click Continue.
-
Navigate to the Export And Deletes tab to view the export status.
-
Upon export completion, select the export name and click Files.
-
Click Download file to save the zip file.


Based on your selection, the emails are now removed from retention, thereby increasing the user's storage. You can view the current storage space status under the Users tab.
Note:
The files under Export And Deletes will be available only for 90 days. Hence download the files immediately after the status shows Completed. Refer to the Export And Deletes section for more details.
User Management
Users
The "Users" tab gives you an overall view of the organization's users and their eDiscovery status (enabled / disabled). Additionally, it will also show you which eDiscovery ingestion filter is associated with each user.
As an administrator, you can also manually enable or disable eDiscovery service for users joined newly or for whom the service was already enabled.
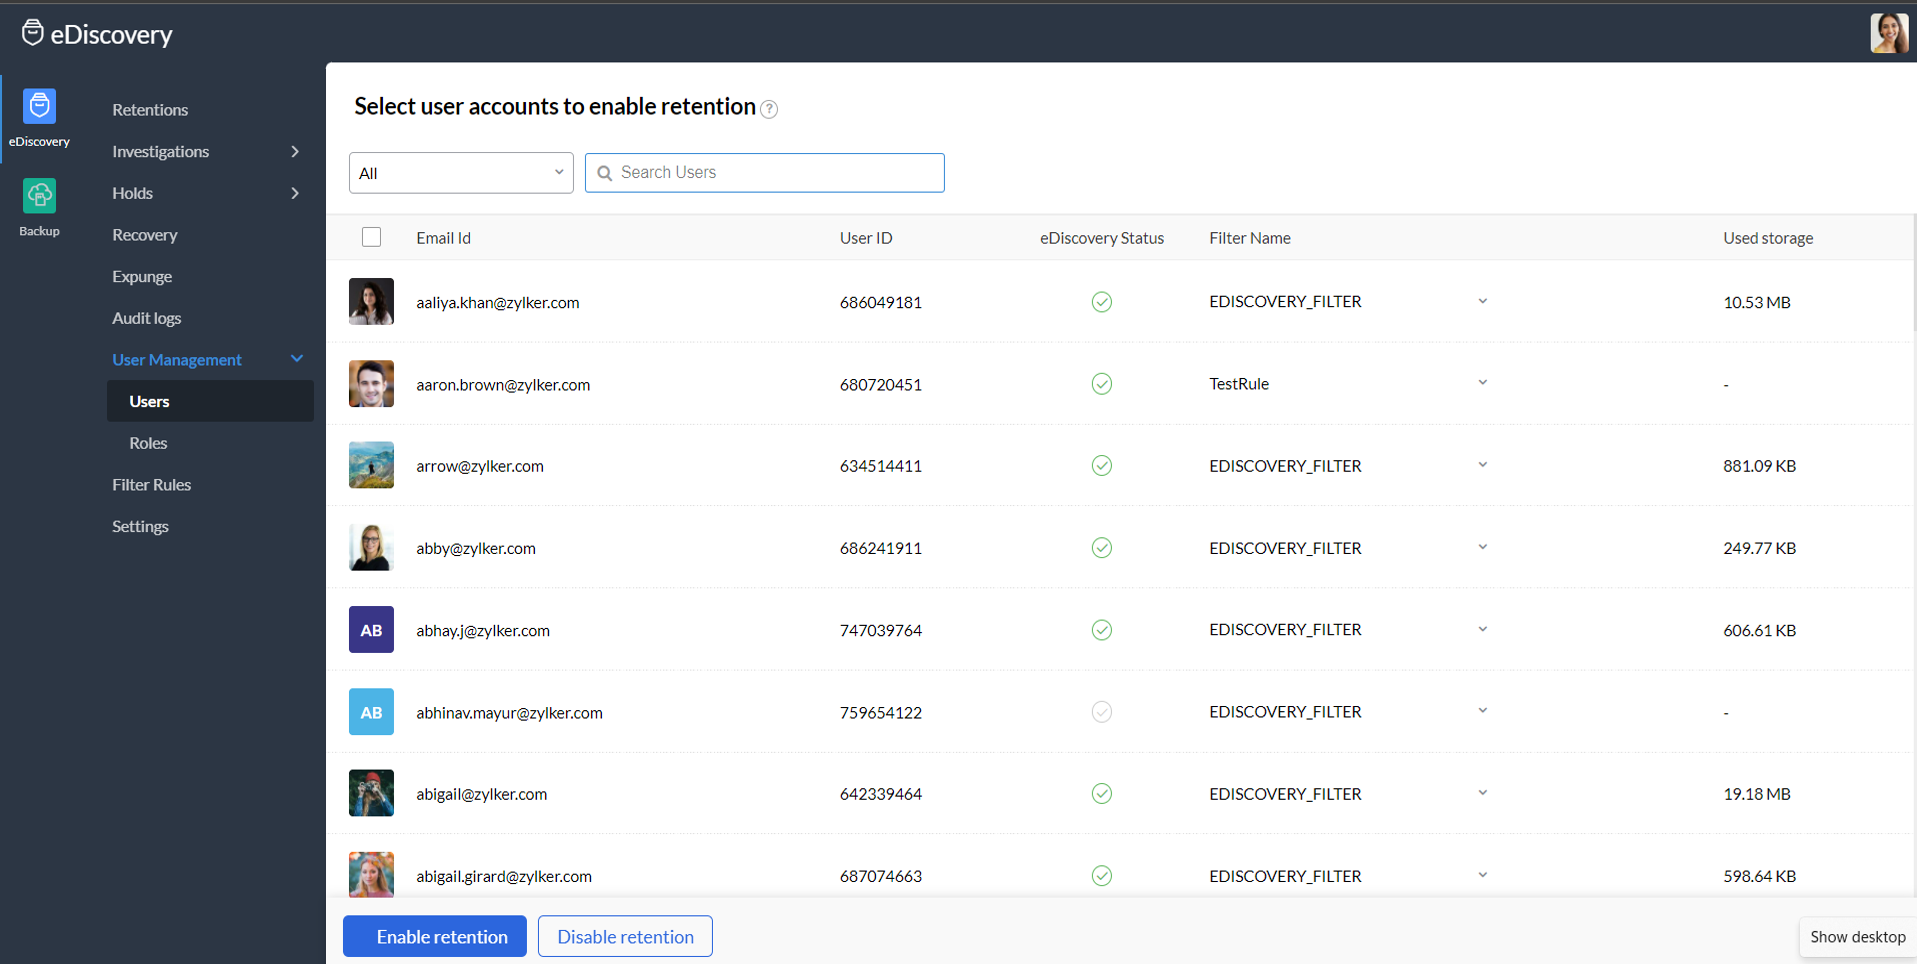
By default, users are associated to the "EDISCOVERY_Filter" configured at the time of on-boarding. You can also alter and associate a custom Ingestion filter for a set of users from the drop down option next to the "Filter Name" provided the custom filters are already added in the Filter Rules > eDiscovery Ingestion Filter > Add Filter option. For defining a new ingestion filter, refer Custom Ingestion Filter.Additionally, you can view how much of the storage has been used by each user is consumed for eDiscovery.
Roles
The super admin and all administrators of an organization, defined in the ZohoMail Admin Console, have complete access to configuration and data on the eDiscovery portal.
For certain users, like legal admins, who require access only to the eDiscovery portal data, but do not require an admin access to the mail settings or to the eDiscovery settings of the organization, an "Admin" access would be an overkill and may compromise the controls within the organization.
This also creates a significant amount of risk as all the users can access, control, search, export or even delete other user's data. As this data is sensitive in nature, it is advisable to limit the access to each user based on the specific requirement.
Roles allow Admins to have a more fine-grained control on who can access and what each user can do within the eDiscovery portal.
There are two types of Roles:
1. System Role
System Role is a role which is pre-defined in the system and has full-fledged access to all the actions in the eDiscovery portal. Users who need complete access to all actions in the eDiscovery portal should be assigned to this role. This being a System role, its permissions cannot be modified.
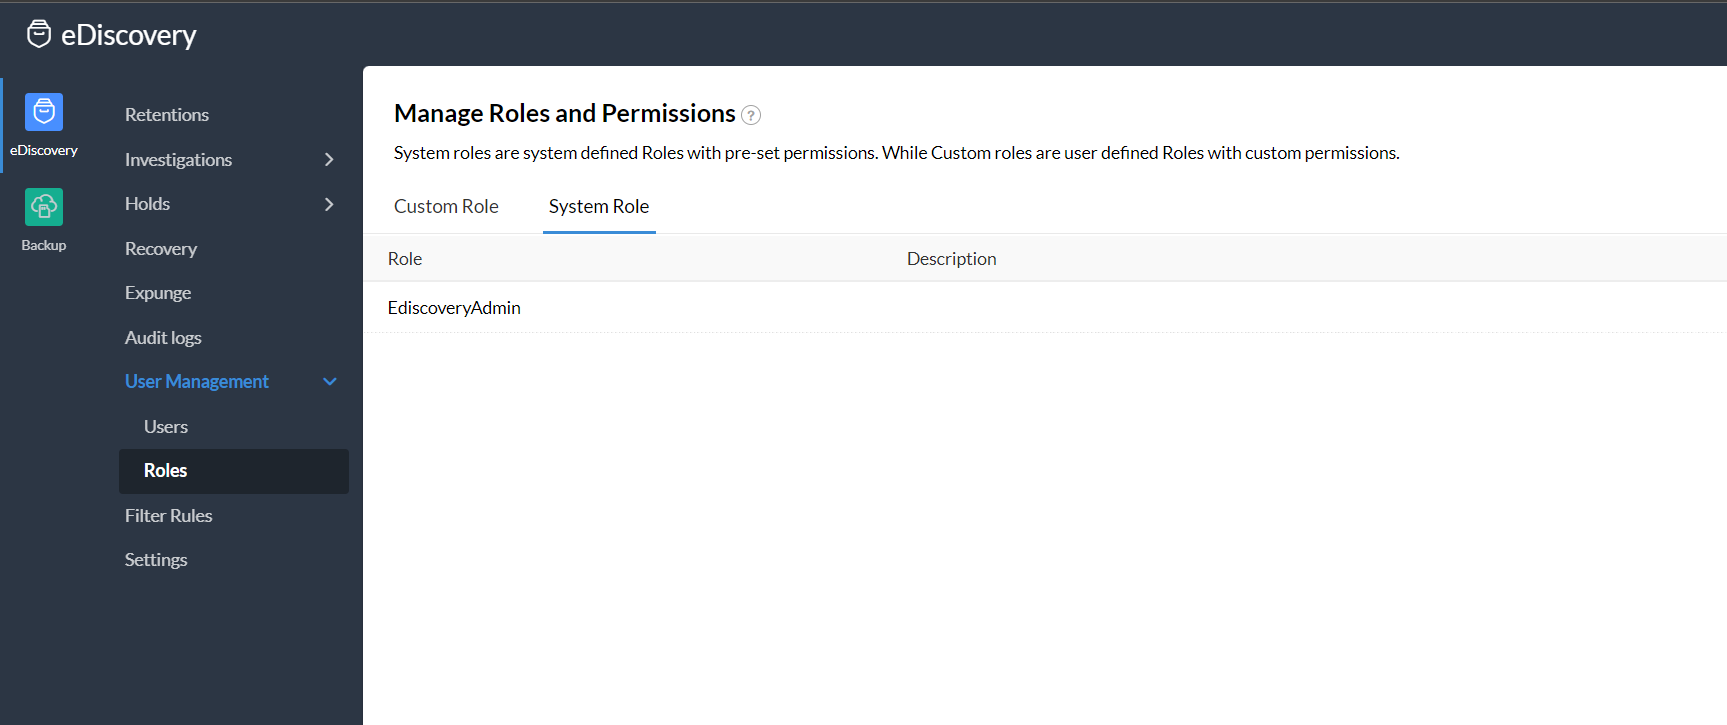
Note:
Enabling or disabling the eDiscovery service and user management permissions are not included in this Role. Users who need control on these two actions also, will need to be added as Admins in the Admin Console. Refer here on how to add an Admin.
2. Custom Role
For more fine-grained control, Admins can create Custom Roles. Permission for these roles can be customized by the Admin as required. The Admin can associate users to a Custom Role. This user will now have access to the actions allowed by this Role.
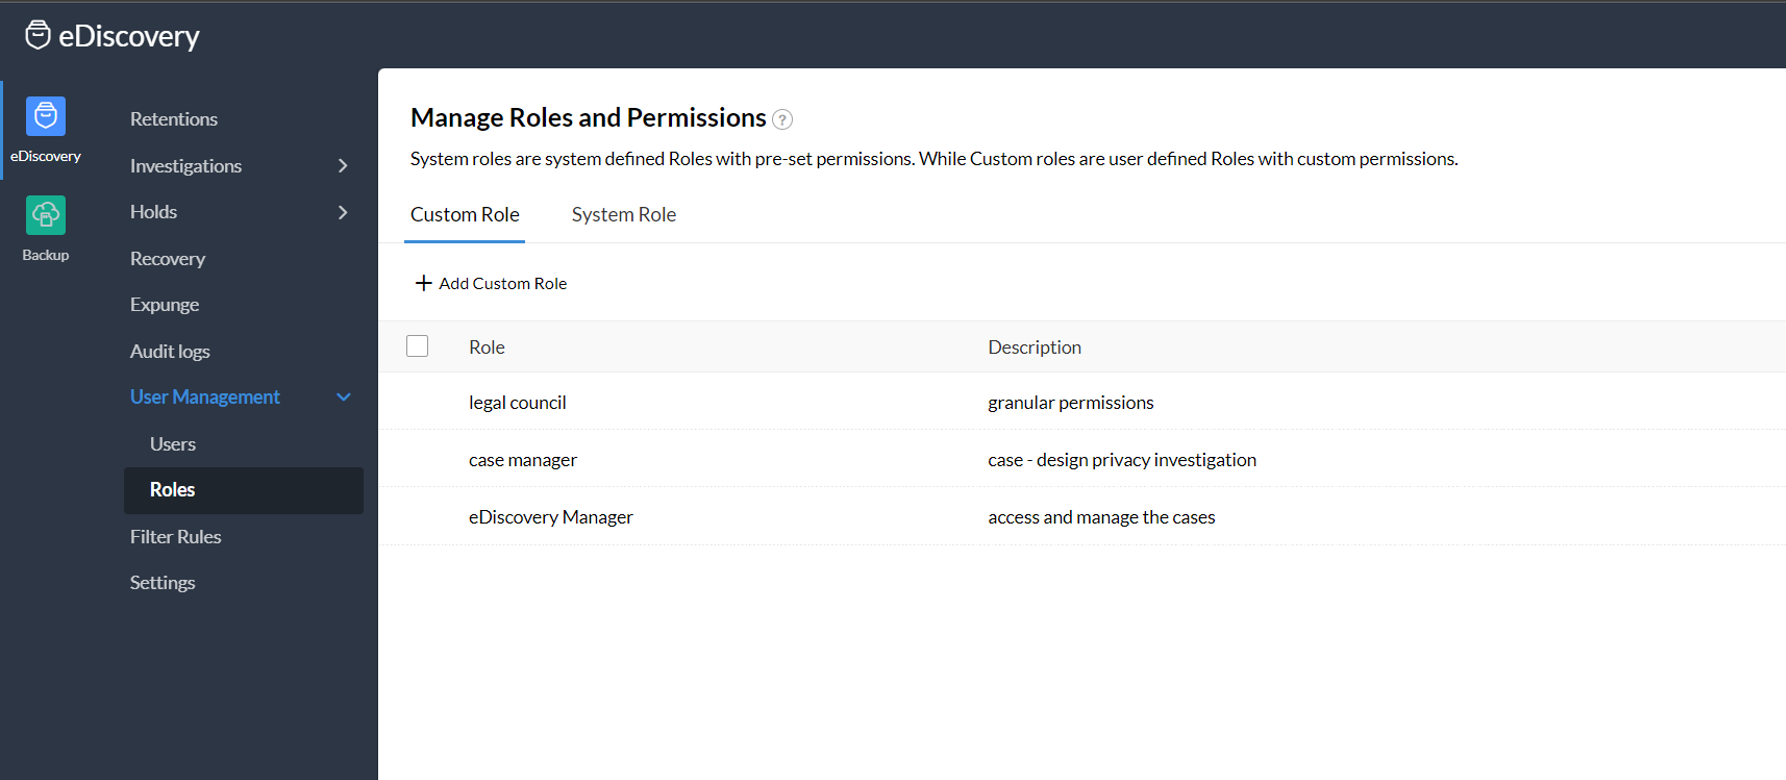
Admins can define as many Custom Roles as required and assign the users as required.
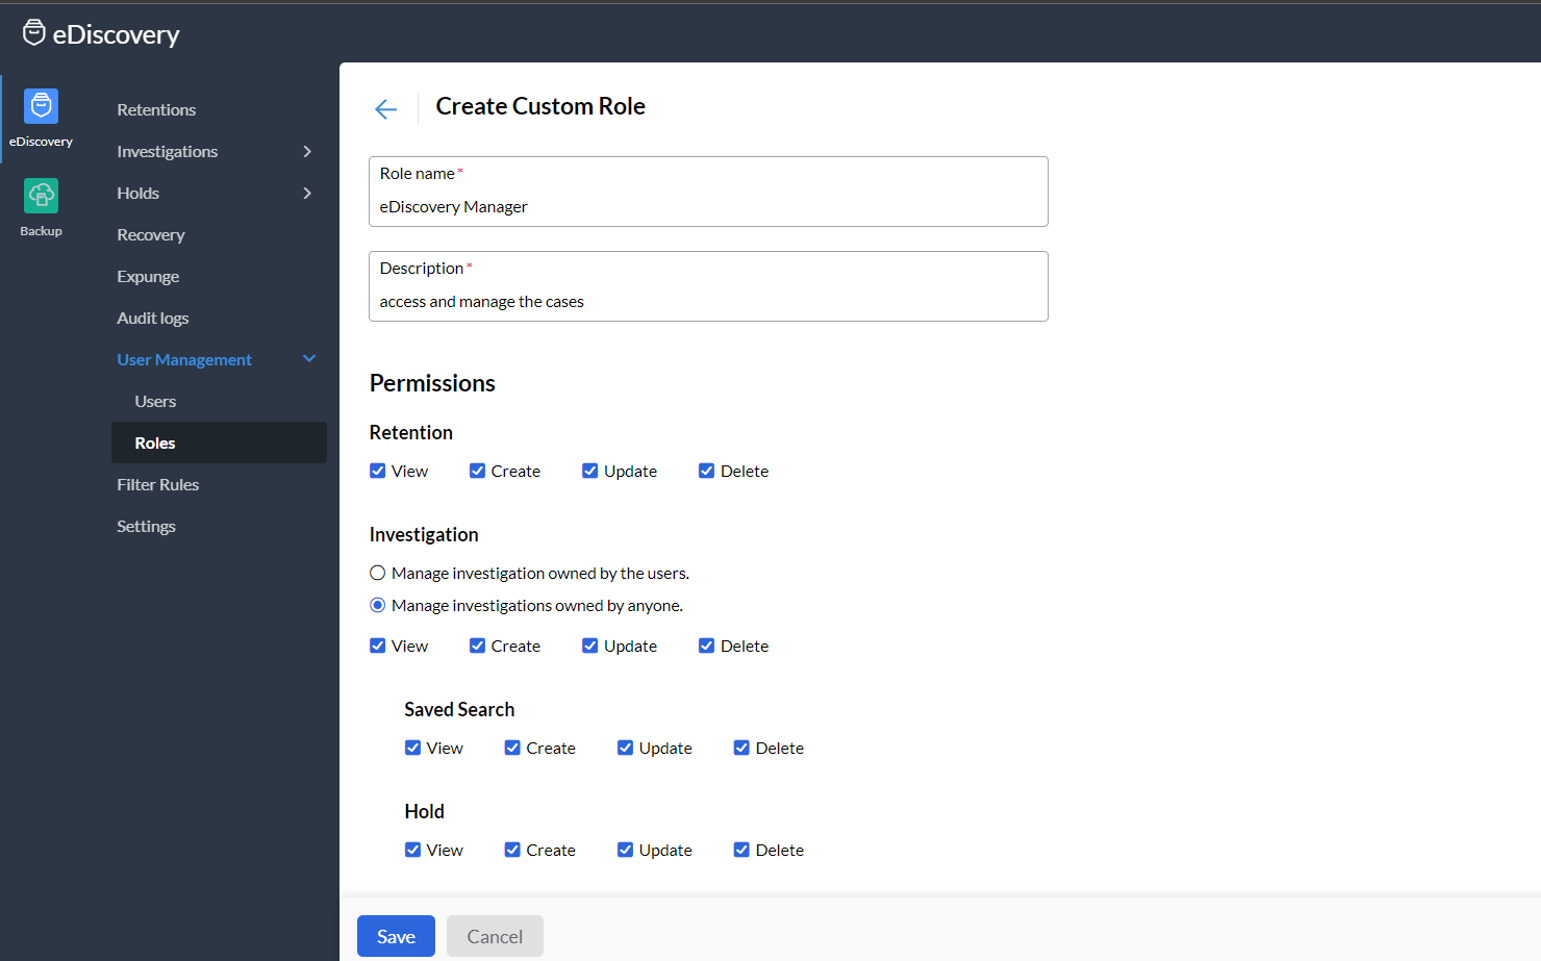
To create a Custom Role:
-
Click on Add Custom Role under the Custom Role tab of Manage Roles and Permissions.
-
Mention the Role name and Description.
-
From the Permissions list, you can enable the required level of permission within each module like Retention, Investigation (Owned by user or anyone), Saved Search, Hold, Tag, Export, Export and Delete, Search Retained Emails, Recovery, Expunge, Audit Logs (Investigation / System), and Filter Rules.
-
You can fine-grain the access based on the level of control under each module as View, Create, Update, Delete, and Download.
-
Once the level of controls are selected under each module, click on Save to apply the changes.
-
Now, go back and click on the Role name from the list to view the general description and permissions enabled for the same.
-
Click on Associated User to view or add users for the said Custom Role.
-
Click on Add to save the changes.
Note:
-
You can assign the role to either one or several users at once.
-
In case 2 or more users are assigned a same role, all these users will have the same privileges.
-
If a single user is associated to 2 or more roles, the user will have combined permission of the roles selected.
Customizing retention policy
By clicking on the Retention tab, you will be able to view all the set default retention policies and the list of custom retention policies. Note that when an email is expired beyond the set retention period, it will be automatically cleaned up or purged, once every 10 days. Just below the default retention policy, you will find an option to create a new custom retention policy. In case there are any special or custom requirements that need certain emails, based on custodians or certain conditional criteria, to be retained for a different period of time, the administrators can define custom retention policies. Custom retention policies can be defined based on various parameters.
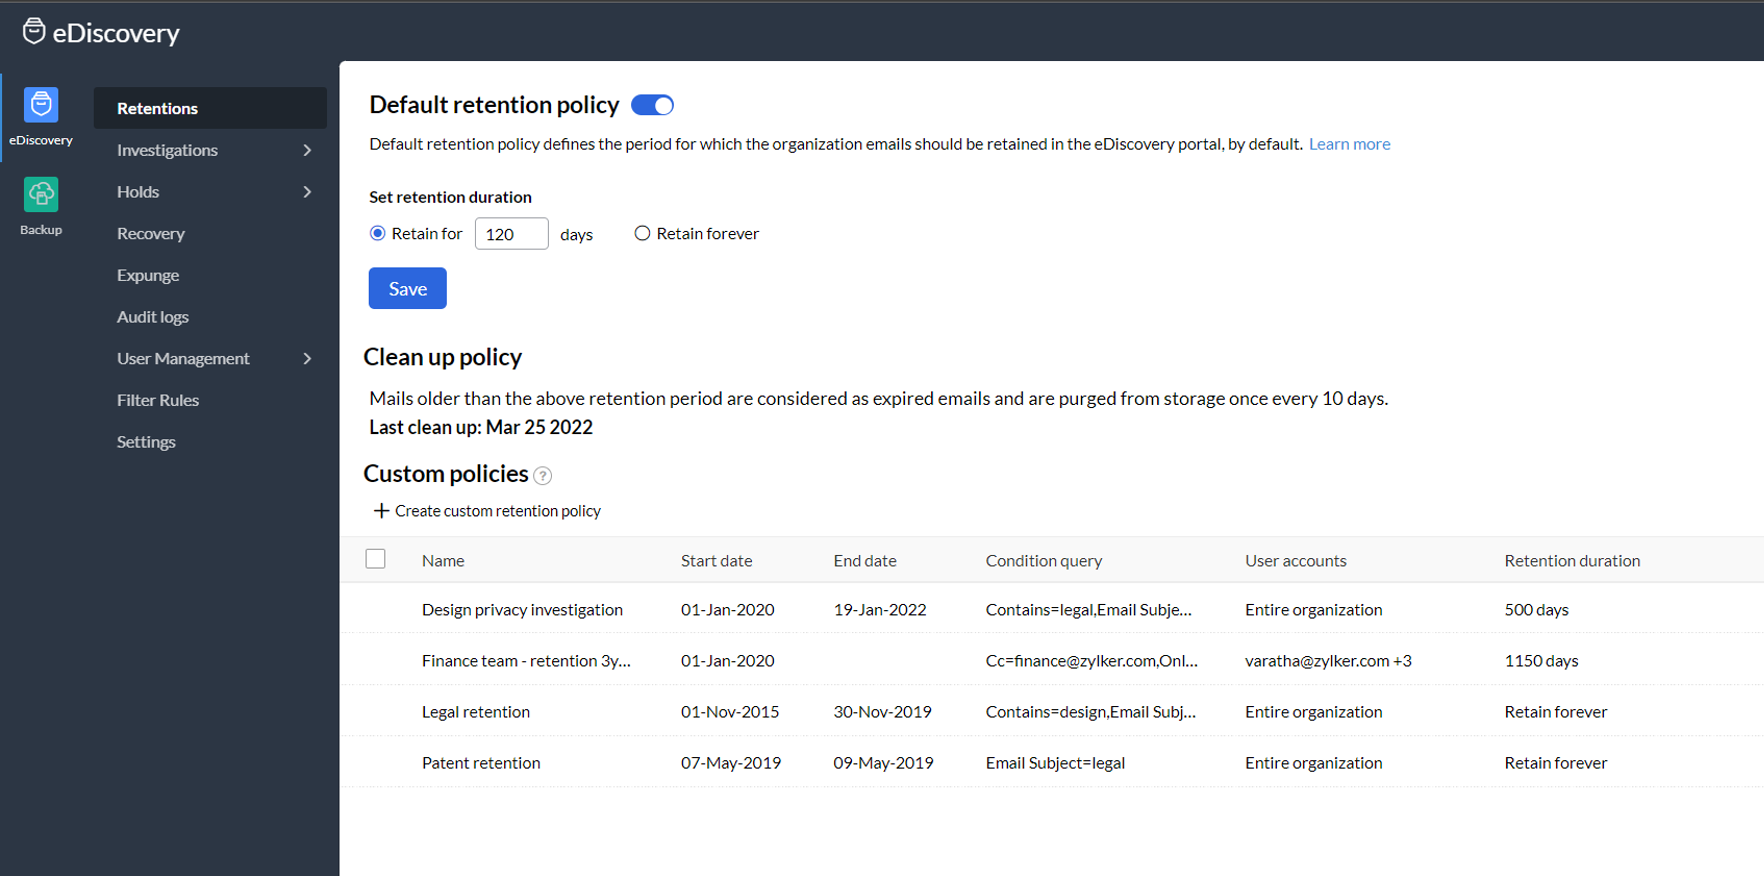
To define new custom policies, follow the below steps:
-
Click the button Create custom retention policy button and provide a name for the custom policy.
-
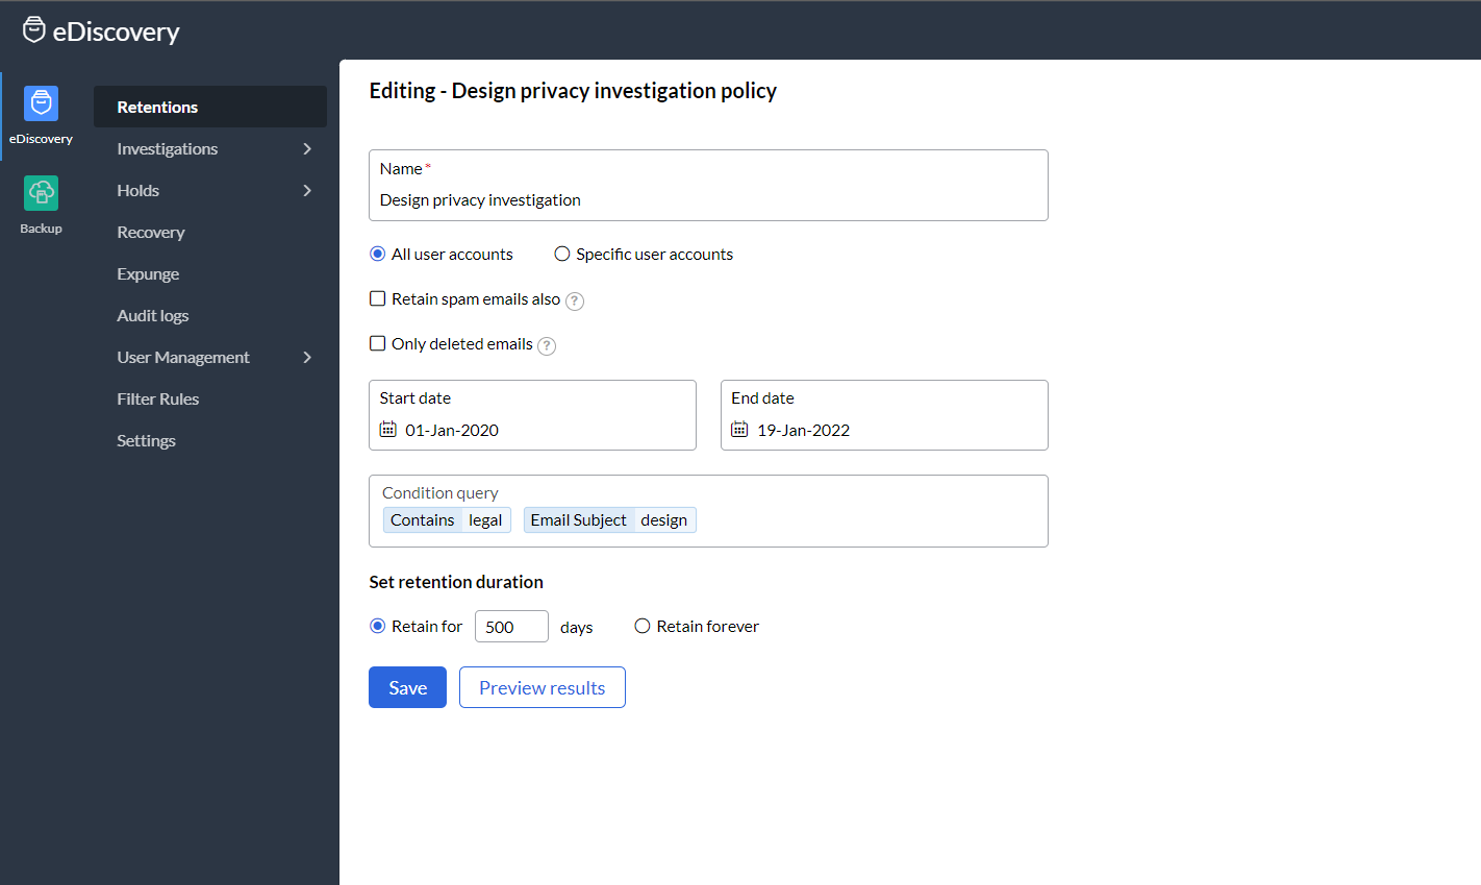
Select the custodian by either checking all user accounts or specific user accounts. In case you select specific user accounts, mention the account names under user mailboxes.
-
Select whether you want to retain the emails marked as spam also.
-
Select the period for which you want to retain the emails that match the requirements of the custom policy.
-
In the Condition query, provide the conditions based on which you want to define the custom policy for email retention from the granular options provided:
-
Contains - contains text/ email address in the entire email
-
Subject - subject contains the selected term
-
Content - email content contains
-
From - from email address contains
-
To - To email address contains
-
Cc - Cc email address contains
-
Bcc - Bcc email address contains
-
Reply To - Reply to email address contains
-
Has attachment - Only the emails with attachment
-
Attachment name - Attachment content contains
-
Attachment content - Attachment content contains
-
Only outgoing emails - Include only outgoing emails
-
Select the period for which you want the emails to be retained under the custom policy. Either you can retain it for specific period of time or you can ‘retain forever’.
-
You can use 'Preview Results' to check whether the condition query provides the expected results.
-
You can 'Save' the retention policy if the search results match the conditions needed for the custom retention policy.
You can create and save multiple retention policies for different purposes. Mostly each custom retention policy will differ based on periods of retention and the conditions required for retention.
Note:
When an email matches multiple custom retention policies, emails are always retained as required by the retention policy with the longest retention period. Email that are on hold are retained till the hold is removed.
Was this article helpful?
Subscribe now & Get the latest updates
©2022, F-Grade GlobalServices Pvt Ltd. All right reserved.